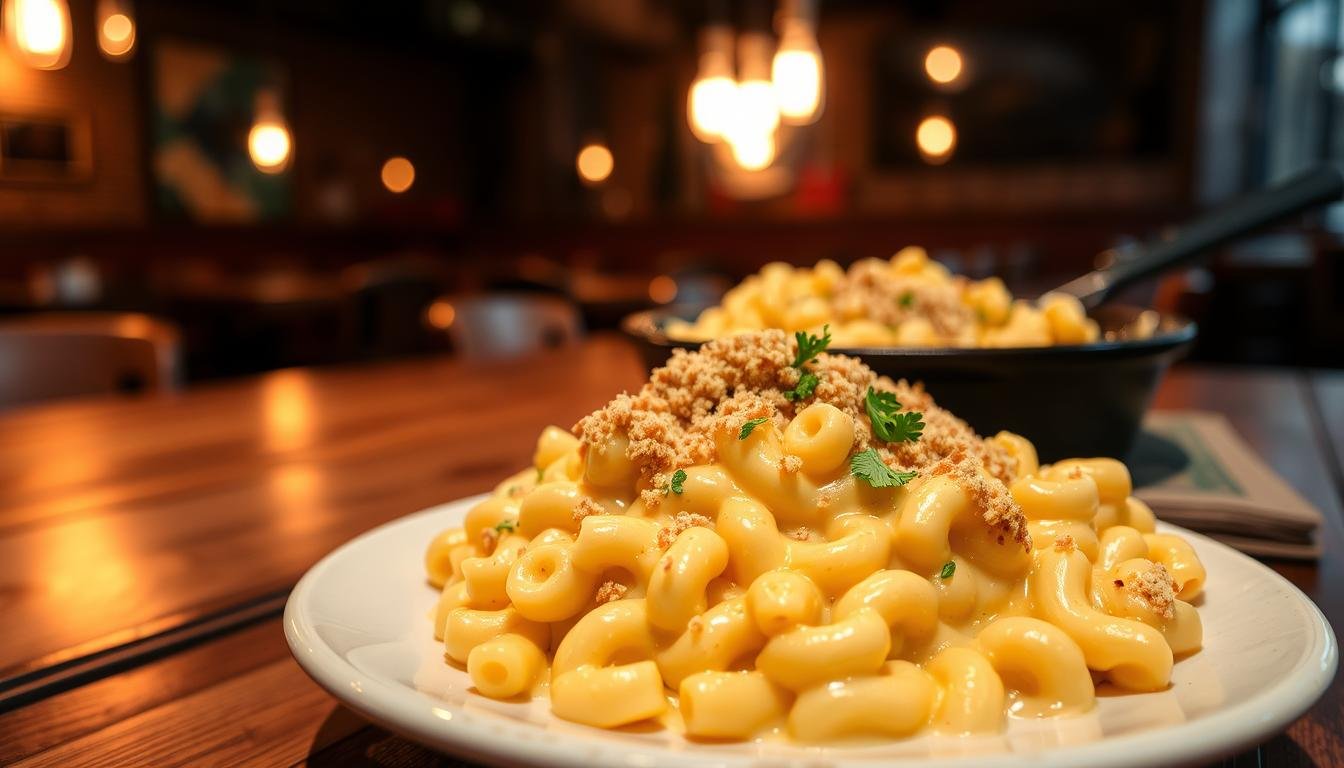
Longhorn Steakhouse Mac and Cheese
We tested a copycat longhorn version created by registered dietician Kristen Carli to bring that restaurant favorite into our kitchen.
This mac cheese-style dish captures a creamy, decadent feel while staying true to the original’s rich profile.
We rely on a blend of premium cheeses and the right pasta to build a velvety sauce that clings to each bite.
A crisp panko topping and a golden-brown crust finish the recipe, turning simple comfort food into a crowd-pleasing, gourmet dinner.
Why This Copycat Longhorn Steakhouse Mac and Cheese Is a Must-Try
Our copycat longhorn steakhouse version nails what many home recipes miss: a silky, non-grainy sauce that clings to each pasta piece. The texture stays extra creamy, not dry, so every bite feels indulgent.
We use a five-cheese blend to build deep flavor without overworking the sauce. A touch of smoky bacon lifts the profile and echoes the restaurant taste.
- The finished top is golden and bubbly for visual appeal and crunch.
- It works as a hearty main or a crowd-pleasing side at family dinners.
- Using freshly shredded cheese avoids the graininess common with pre-shredded products.
This copycat longhorn approach lets you enjoy restaurant-quality comfort at home. Try it for holidays or a busy weeknight and expect repeat requests.
| Feature | Copycat Version | Standard Homemade | Result |
|---|---|---|---|
| Cheese Blend | Five-cheese mix | Single or pre-shredded | Richer flavor, smoother melt |
| Texture | Silky, non-grainy | Often grainy | Restaurant-quality mouthfeel |
| Topping | Golden, bubbly crust | Light or absent | Crunch and visual appeal |
Essential Ingredients for Your Steakhouse Experience
To capture that rich, savory profile, we focus on precise ingredient choices that form the backbone of the recipe.
Start with a balanced five-cheese blend. We use Gruyère, fontina, sharp cheddar, and grated parmesan to build depth and meltability. Grating from blocks keeps texture smooth and avoids anti-caking agents found in pre-shredded bags.
Selecting the Right Cheeses
Use high-quality cheese for the sauce. Each cheese plays a role: Gruyère adds nuttiness, fontina brings creaminess, sharp cheddar gives bite, and parmesan cheese adds a salty finish. Measure one cup of the combined blend for predictable consistency.
Choosing Your Pasta
Cavatappi or cellentani is our top pick. The corkscrew shape traps sauce so every forkful carries creamy flavor. Cook to al dente so the pasta holds up in the oven.
We also prepare a classic roux with butter and all-purpose flour as the base. This gives the sauce body and prevents separation when we add dairy and melted cheeses.

| Ingredient | Role | Recommended Amount |
|---|---|---|
| Gruyère | Nuttiness and smooth melt | 1/4 cup |
| Fontina | Creamy texture | 1/4 cup |
| Sharp cheddar | Bold flavor | 1/4 cup |
| Parmesan cheese | Salty, nutty finish | 1/4 cup (grated) |
| Cavatappi pasta | Holds sauce in crevices | 12 ounces |
| Butter & Flour (roux) | Base for sauce | 3 tbsp butter, 3 tbsp flour |
Preparing Your Kitchen and Ingredients
We begin every cook by arranging tools and ingredients so the kitchen runs like a small restaurant line. This step keeps the longhorn steakhouse mac preparation smooth and calm.
Start by setting your oven to 350 F so it reaches temperature while you work. It is best to preheat oven before you boil pasta so the bake can start the moment you assemble the dish.
Gather bacon, cheeses, pasta, butter, and flour on the counter. Having these items handy speeds the process and helps us follow the recipe without interruption.
- Check the pantry for staples like flour and butter before shopping.
- Organize bowls, measuring cups, and a colander within reach.
- Lay out shredded and grated cheeses, or shred from blocks to avoid additives.
| Prep Step | Why It Helps | Timing |
|---|---|---|
| Set oven to 350 F | Ensures immediate baking readiness | Before boiling pasta |
| Mise en place | Reduces stress and errors | 5–10 minutes |
| Check pantry | Avoids last-minute trips | Before starting |
With your space organized, we can focus on technique. This approach makes the copycat longhorn process enjoyable and efficient when preparing multiple restaurant-style recipes for guests.
Boiling the Perfect Pasta
We always begin by bringing a large pot of water to a steady boil so the cavatappi has room to move and cook evenly.
Achieving the Ideal Al Dente Texture
Salt the pot water generously; this is the only chance to season the pasta itself. Use coarse salt and add it once the water is boiling.
Maintain a steady boil over medium heat and watch the time. Cook pasta until just al dente—slightly firm—because it will soften further when mixed with the hot sauce.
- Use a large pot so the noodles won’t stick and will cook uniformly.
- Keep water at a rolling boil over medium heat to avoid clumping.
- Follow package minutes as a guide, then test a piece for slight chewiness.
- Drain the pasta thoroughly and set aside while we finish the sauce in the skillet.

| Step | Why It Matters | Timing |
|---|---|---|
| Large pot water | Prevents sticking and promotes even cooking | Fill pot 3/4 full |
| Salt generously | Seasons the noodles at the only effective moment | Add at boil |
| Monitor heat | Keeps a steady boil for consistent texture | Medium heat throughout |
| Drain and rest | Stops cooking and readies pasta for sauce | After recommended minutes |
Mastering the Creamy Cheese Sauce
The secret to an ultra-creamy sauce lies in a patient roux and low, controlled heat. We build the base first, then add dairy and melt the cheeses slowly. That sequence guarantees a silky, lump-free finish for our mac cheese.
Creating the Roux
We melt butter in a large saucepan over medium heat. Then we whisk in flour and cook for 1–2 minutes until the mixture smells nutty and turns pale gold.
Whisking continuously prevents lumps and gives the sauce body that coats every piece of pasta.
Incorporating the Dairy
Next we add milk or half-and-half slowly, keeping the heat at medium-low. We whisk constantly for about five minutes until the sauce thickens to a velvety consistency.
Maintaining low heat here prevents separation and a grainy texture in the finished cheese sauce.
Melting the Cheese Blend
We add cheese one handful at a time, stirring until each addition melts fully. This measured approach creates a glossy, even sauce.
Our blend includes Gruyère, fontina, and parmesan cheese for depth and meltability. Keep the heat gentle and stir until smooth.
| Step | Timing | Pro Tip |
|---|---|---|
| Roux (butter + flour) | 1–2 minutes | Medium heat, constant whisking |
| Add dairy | About 5 minutes | Pour slowly, keep heat low |
| Incorporate cheese | 2–4 minutes | Add handfuls, stir until fully melted |
Combining Pasta and Sauce for Maximum Flavor
After draining, we pour the warm cheese sauce over the cavatappi in a large mixing bowl. We stir gently so the sauce clings to every spiral and the pasta keeps its shape.
At this stage we fold in crispy bacon so the smoky pieces distribute through the bowl. Adding bacon while the mixture is warm helps the fat meld with the sauce and lift flavor.
- Use a baking dish sprayed with nonstick cooking spray to prevent sticking.
- Taste and add a teaspoon of smoked paprika or other spice to brighten the sauce.
- Work quickly while heat remains; warm pasta absorbs the cheese sauce best.
If a recipe calls for a cup of reserved pasta water, add a splash to loosen the mix. We use a large bowl to combine ingredients without crushing the corkscrew pasta.
| Step | Why | Time |
|---|---|---|
| Combine pasta + sauce | Ensures even coating | 1–2 minutes |
| Add bacon & spices | Distributes smoky flavor | 30 seconds |
| Transfer to baking dish | Ready for baking and crust | Less than 1 minute |
Adding the Signature Topping
We add a savory, golden crust that contrasts the rich sauce beneath. Start by crumbling crisp bacon and mixing it with panko breadcrumbs for a bright crunch.
Sprinkle a generous, even layer of the panko and bacon across the assembled mac cheese. Scatter the mix so every serving gets that toasted bite.
- Use a teaspoon of garlic powder in the breadcrumbs to boost savory notes.
- Add the bacon and breadcrumbs just before baking so they stay crisp.
- Press the topping lightly so it adheres without compressing the pasta.
| Topping | Benefit | Amount |
|---|---|---|
| Panko breadcrumbs | Light, crunchy texture | 3/4 cup |
| Crumbled bacon | Smoky, savory contrast | 1/2 cup |
| Garlic (teaspoon) | Extra savory layer | 1 tsp |
Baking to Golden Perfection
Sliding the baking dish into a hot oven starts the final alchemy: bubbling sauce and toasted breadcrumbs.
We preheat oven to 350 F and bake the assembled mac cheese for 15 to 20 minutes. At 20 minutes the cheese sauce usually bubbles through the pasta and the top reaches a deep, even color.
Before baking, we toss panko with a teaspoon of olive oil and fold in crumbled bacon. That small step helps the breadcrumbs brown without drying out.
- Place the dish in the center rack so heat circulates evenly.
- Watch the top closely in the last few minutes to prevent burnt breadcrumbs.
- Use oven mitts when removing the baking dish; the sauce will be very hot and bubbly.

| Step | Temperature | Timing |
|---|---|---|
| Preheat oven | 350 F | Before assembly |
| Bake | 350 F | 15–20 minutes |
| Final check | Top golden | Watch last 2–3 minutes |
Pro Tips for Restaurant-Quality Results
A few precise habits in the kitchen lift a home recipe to that table-ready finish.
We always shred cheeses from a block to avoid anti-caking agents that make the sauce grainy. Use full-fat cheddar, fontina, and parmesan for the best melt and silkiness.
Keep the heat low when adding shredded cheese so the sauce stays glossy and doesn’t separate. Stir patiently and add cheese in small handfuls.
- Salt pasta water generously; it’s the only chance to season the noodles.
- Cook pasta to al dente so it holds shape after baking.
- Mix panko breadcrumbs with crumbled bacon for the signature crunchy top.
- Add a teaspoon of dry mustard or garlic powder to deepen the sauce flavor.
| Tip | Why it works | Timing |
|---|---|---|
| Shred from block | Prevents grainy texture in cheese sauce | Before starting, 5–10 minutes |
| Low heat cheese addition | Keeps fats emulsified and glossy | During sauce assembly, continuous |
| Panko + bacon topping | Creates crunchy contrast and savory lift | Scatter before baking, then bake 15–20 min |
Storing and Reheating Your Leftovers
Proper storage makes enjoying this recipe again almost as good as the first night. Follow a few simple steps to protect texture and flavor so each serving stays creamy and satisfying.
Proper Refrigeration Techniques
Allow the dish to cool completely before covering. We then transfer portions to an airtight container or cover the baking dish tightly.
Store in the refrigerator for up to 5 days. Avoid freezing—the creamy sauce breaks down when thawed and will lose its silky feel.
Best Methods for Reheating
For the best result, reheat in the oven at 350 F for about 10 minutes. This restores the top crunch and warms the interior evenly.
If you need a faster option, heat single servings in the microwave using 20-second intervals and stir between each until hot throughout.
- Add a half cup of milk or cream before reheating to revive the sauce’s creaminess.
- Reheat until the center reaches the desired temperature; check after the first 5 minutes if using an oven.
- Keep breadcrumbs or extra panko separate and toast briefly before sprinkling on top for fresh crunch.
| Storage | Time | Best Use |
|---|---|---|
| Airtight container | Up to 5 days | Reheat in oven for even heat |
| Covered baking dish | Up to 5 days | Slide straight into the oven |
| Frozen (not recommended) | Not advised | Texture and sauce may separate |
Bringing the Steakhouse Vibe to Your Dinner Table
This recipe turns humble pantry ingredients into a creamy, bacon-topped comfort dish that everyone will request again. We show how a cup of shredded cheese and crisp bacon lift simple pasta into a special meal.
Serve the finished plate with a fresh salad or a grilled protein for a complete dinner. Baking takes only minutes, and a few careful steps give a restaurant feel at home.
We hope this copycat longhorn steakhouse mac becomes a go-to. Try our other copycat longhorn recipes if you enjoyed the process and want more steakhouse mac inspiration.